
Simple Cheeseboard
Need a quick hors d’oeuvres idea for entertaining guests with various dietary preferences? This cheeseboard easily satisfies omnivores, vegetarians, and gluten-free diets alike. It’s elegant, quick and easy to put together, and then there is the wonderful assortment of cheeses. You can’t go wrong with a Simple Cheeseboard as an appetizer!
Simple can be quite impressive, especially with this cheeseboard! This is more of a guideline than a recipe, because you can use your favorite cheeses and fruits to tailor it to your guests. Want to read more about how to customize this cheeseboard? Read about in our Blog Comments & Tips.
Sign up for a free subscription to our monthly newsletter and access to exclusive content.
To browse some of our favorite kitchen essentials, gadgets, and pantry items, visit our Recommended Products page.
RECIPE
(Check out our Step by Step Instructions below the recipe card.)
Recipe updated as of 3/23/22

SIMPLE CHEESEBOARD
Ingredients
Instructions
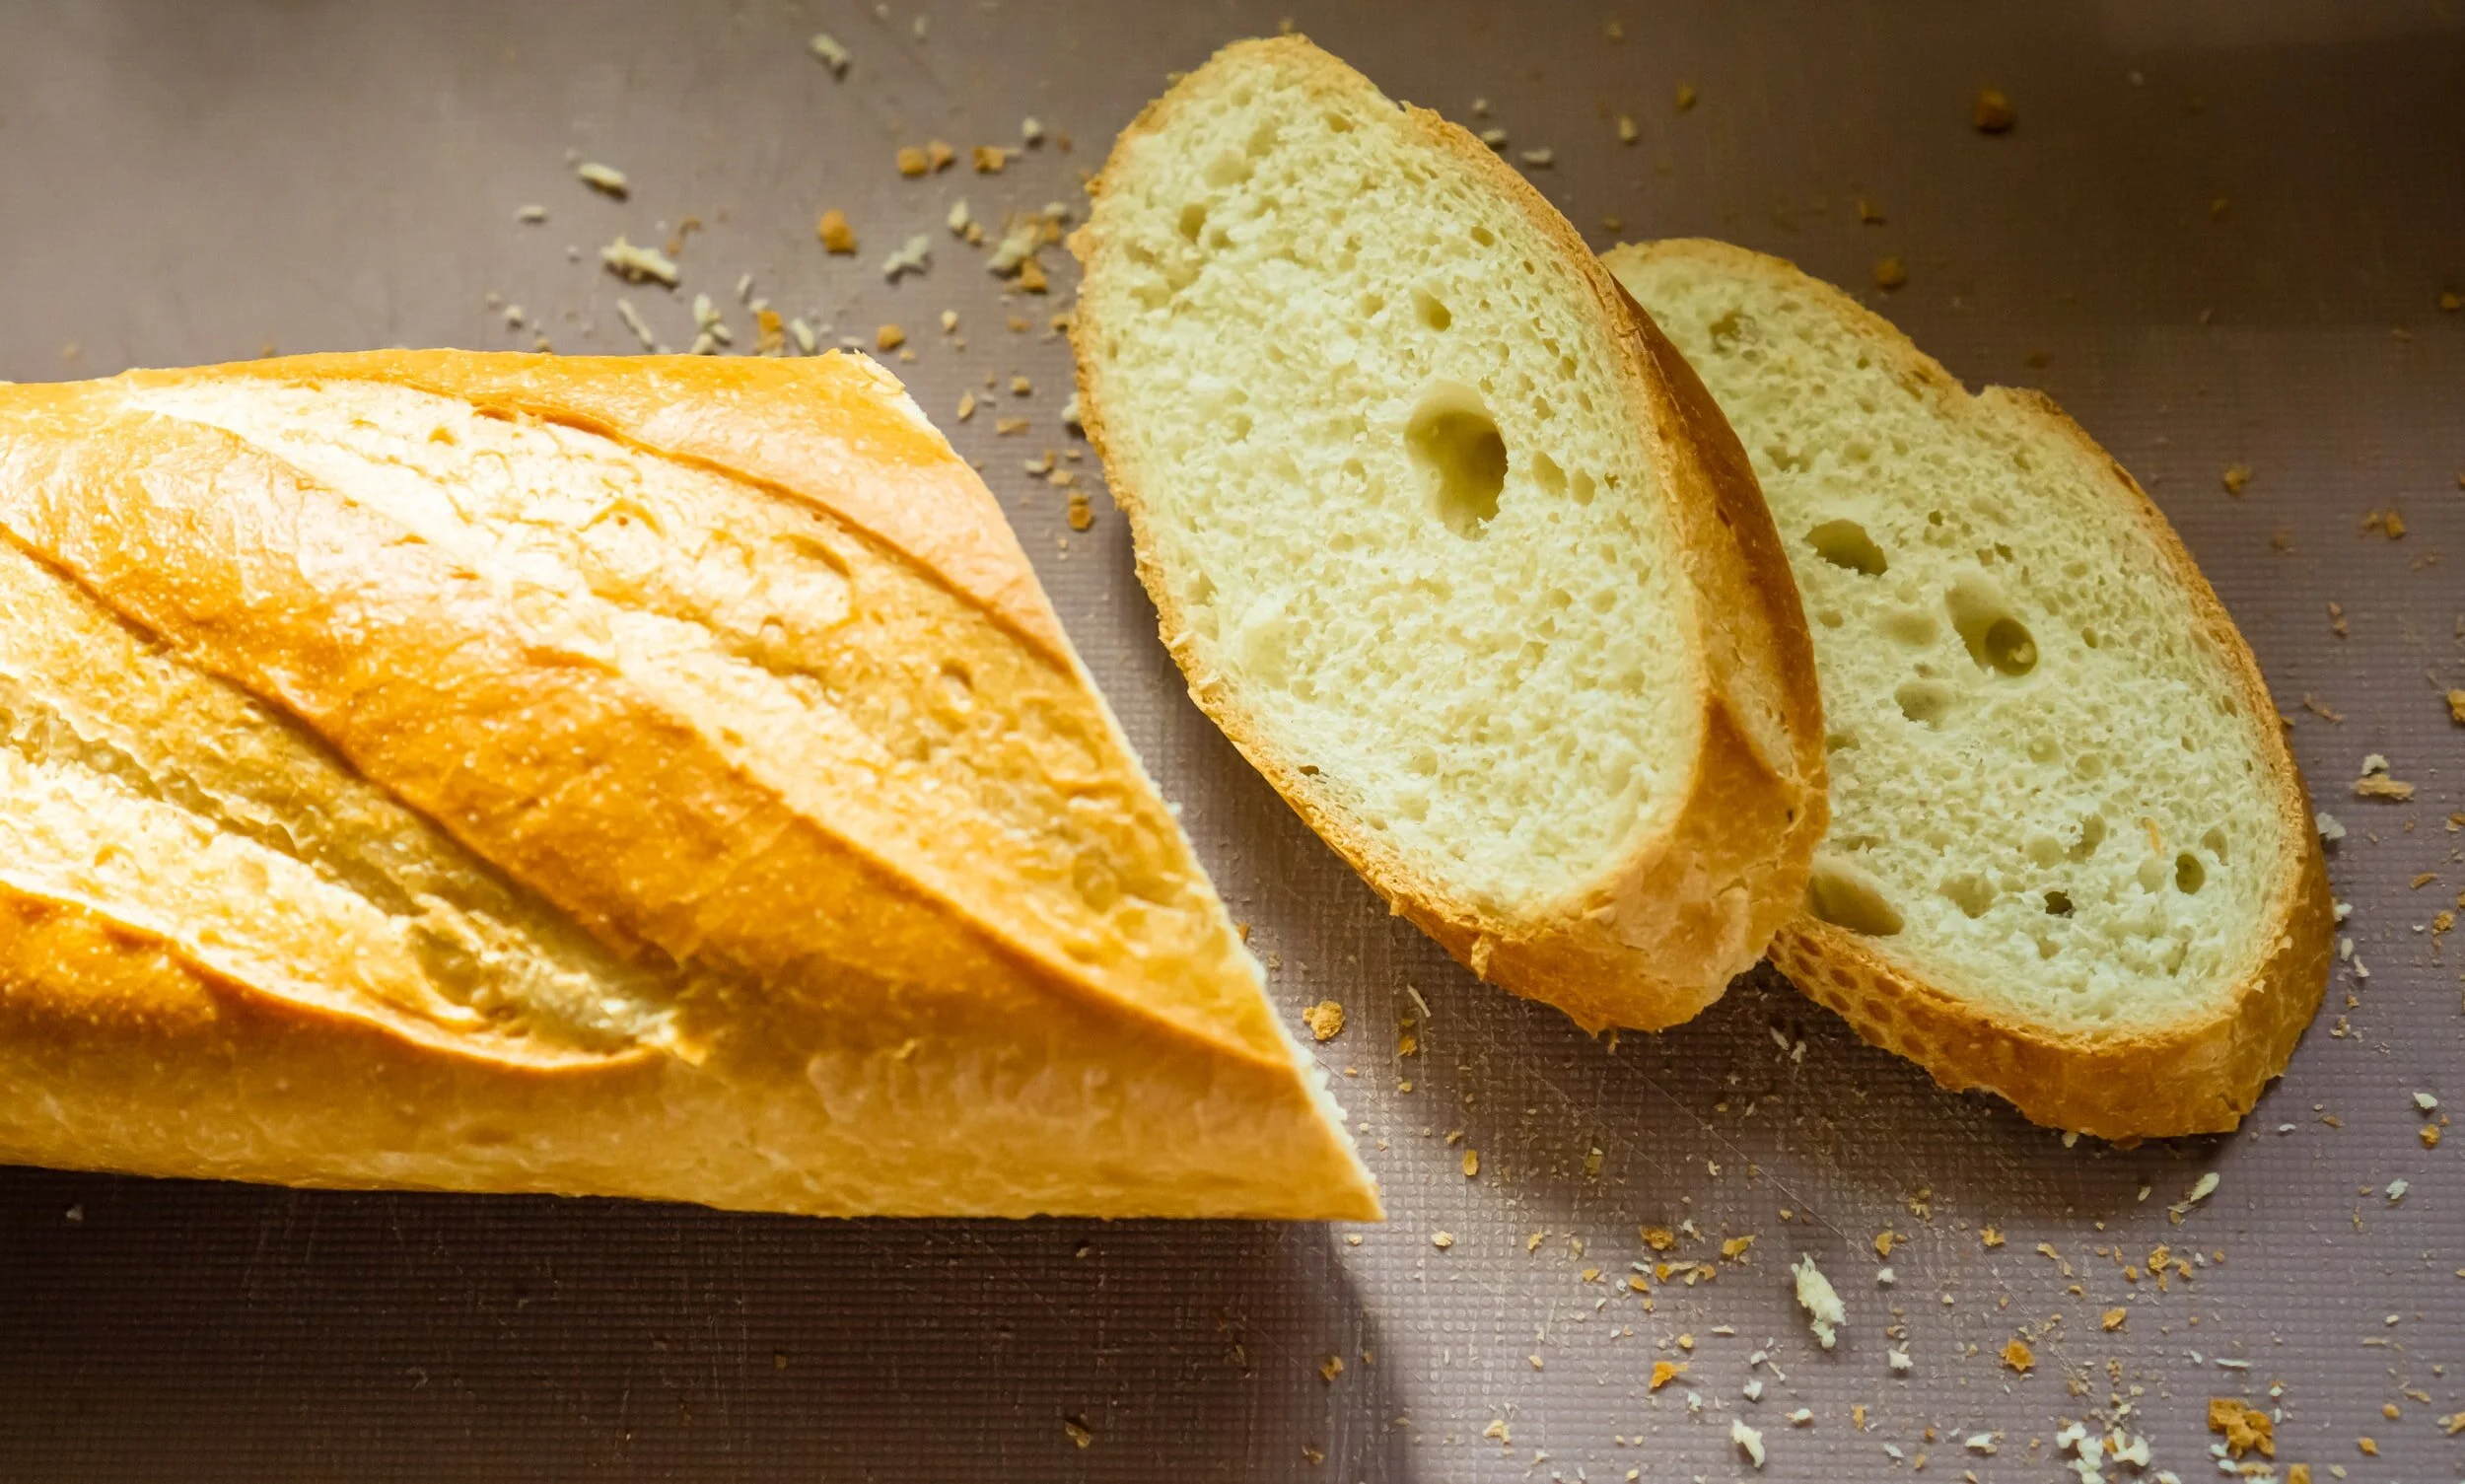
- Preheat your oven (or toaster oven) and bake a demi-baguette of take-and-bake French bread, according to the recommended instructions on the package. Once bread is baked, let it rest for 2-3 minutes, then diagonally slice 3 ounces from the demi-baguette (about ½ a demi baguette), and set aside.
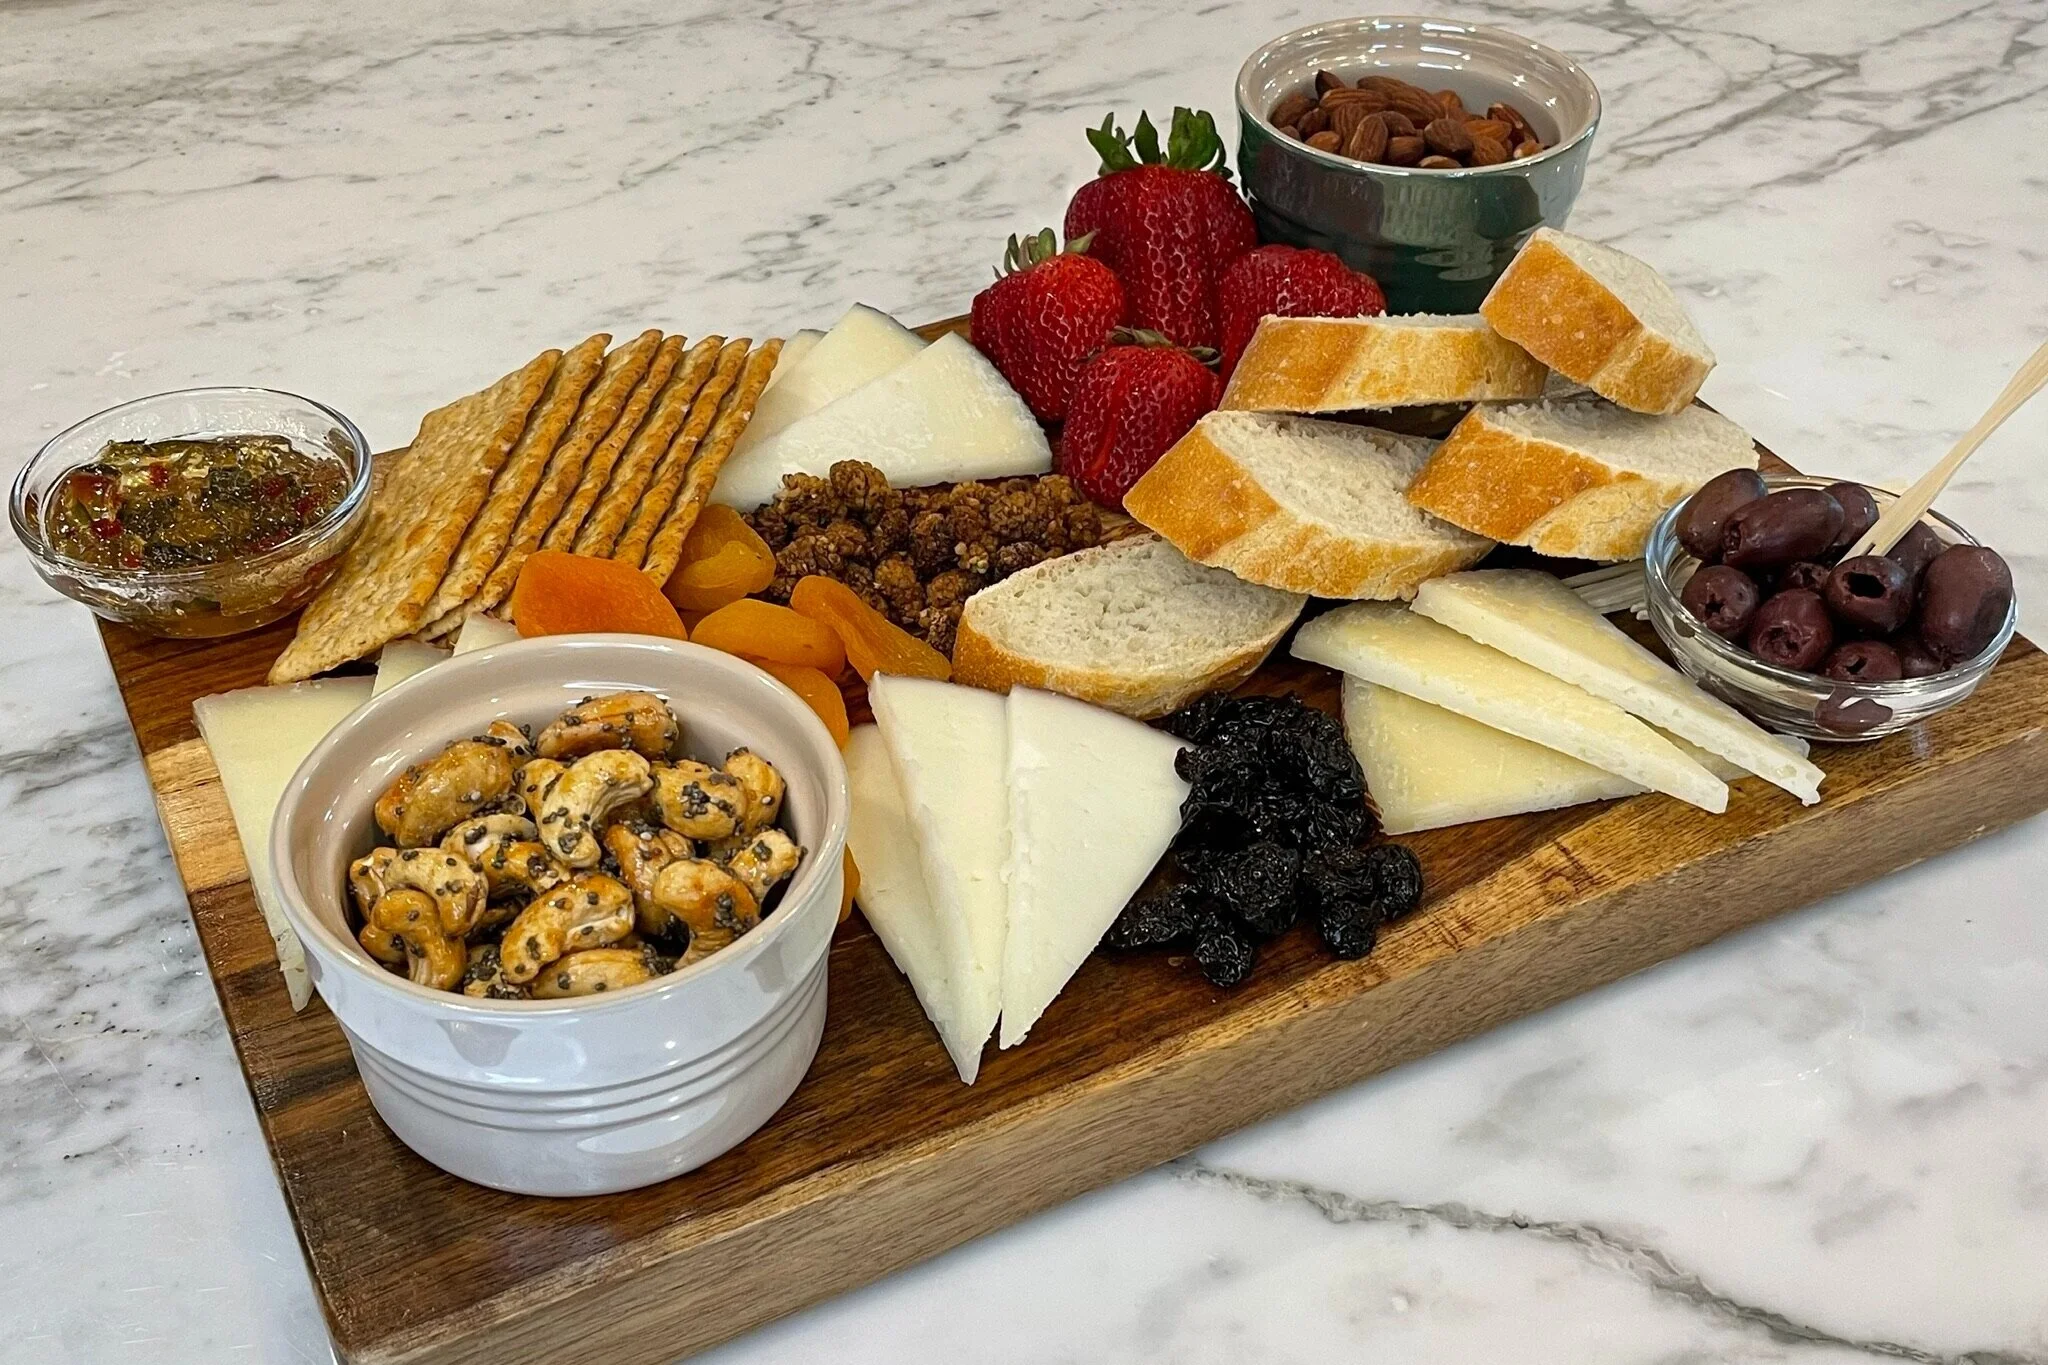
- To create the foundation for your cheeseboard, you will need a beautiful wooden board and four decorative ramekins (or regular ramekins, or glass bowls). Add Kalamata olives to one ramekin. Then add almonds, Healthy Cashews, and jalapeño jelly to the other three ramekins. Place one ramekin at each corner of the board. Then neatly arrange each stack of assorted Spanish cheeses (Manchego, Castellano, Iberico, Wine Soaked) around the board. Then pile strawberries, organic mulberries, dried tart cherries, and dried apricots, in clumps around the board. To finish, stack Pink Himalayan Multigrain Crackers and sliced French baguette, to fill in the gaps. The board should be full, but not overflowing. Serve with small spoons in each of the ramekins, and decorative toothpicks for the olives.
Notes
- Bread: A take-and-bake style baguette will give you the freshest tasting bread option for this cheeseboard. If it’s not available, just heat up your favorite baguette or bread until it’s warm, and slice on the diagonal.
- Substitutions: Don’t be afraid to experiment with different products and cheeses. This simple cheeseboard is completely customizable. You can use your favorite regular or sourdough baguette, any brand of regular or gluten-free crackers, any fresh and dried fruits, olives, preserves, and any type of cheeses you prefer. Just make sure to pair your cheeses, fruits, nuts, preserves, and olives to complement the flavors of each of the items.


Nutrition Facts
Calories
829.85Fat (grams)
53.92Sat. Fat (grams)
13.74Carbs (grams)
78.89Fiber (grams)
10.41Net carbs
72.47Sugar (grams)
44.48Protein (grams)
27.46Sodium (milligrams)
839.12Cholesterol (grams)
42.10Nutritional information provided is strictly an estimate and will vary based on ingredient brands and cooking methods.
Step by Step Instructions
PREPARATION
Organize all your tools and ingredients before you begin. Getting all your ingredients in one place at the beginning will shorten your prep time.
STEP 1
Preheat your oven (or toaster oven) and bake a demi-baguette of take-and-bake French bread, according to the recommended instructions on the package. Once bread is baked, let it rest for 2-3 minutes, then diagonally slice 3 ounces French baguette (½ a demi baguette), and set aside.
Note: For gluten-free option, you can skip this step. Just replace the baguette with an assortment of gluten free crackers.

STEP 2a
To create the foundation for your cheeseboard, you will need a beautiful, large wooden board (see Note A below) and four decorative ramekins (or regular ramekins, or glass bowls). Add ½ cup pitted and drained Kalamata olives to one ramekin. Then add ½ cup dry roasted and salted almonds, 1 cup Healthy Cashews (try our recipe), and ¼ cup jalapeño jelly to the other three ramekins. Place one ramekin at each corner of the board. Then neatly arrange each stack of assorted Spanish cheeses (6 ounces of Manchego, Castellano, Iberico, and Wine Soaked) around the board. Then pile 5 ounces whole fresh strawberries, 3 tablespoons organic mulberries, 3 tablespoons dried tart cherries, and 1 cup dried apricots, in clumps around the board.
Note A: If you are looking for a more organic shape for your cheeseboard, try this unique 14 inch olive wood cheeseboard/cutting board.
Note B: See Notes section for Make Ahead Preparation.

STEP 2b
To finish, stack 2 ¼ ounces pink Himalayan multigrain crackers (½ box), and sliced French baguette, to fill in the gaps. The board should be full, but not overflowing. Serve with small spoons in each of the ramekins, and decorative toothpicks for the olives.
Note: See Notes section for Make Ahead Preparation.
Notes:
Bread: A take-and-bake style baguette will give you the freshest tasting bread option for this cheese board. If it’s not available, just heat up your favorite baguette or bread until it’s warm, and slice on the diagonal.
Substitutions: Don’t be afraid to experiment with different products and cheeses. This simple cheese board is completely customizable. You can use your favorite regular or sourdough baguette, any brand of regular or gluten-free crackers, any fresh and dried fruits, olives, preserves, and any type of cheeses you prefer. Just make sure to pair your cheeses, fruits, nuts, preserves, and olives to complement the flavors of each of the items.
Make Ahead Preparation: Partially assemble the board with the variety of cheeses, cover with plastic wrap, and let it sit on the counter for 30 minutes or more, to allow it to come to room temperature. About 15 minutes before you are ready to serve, bake the bread, arrange the rest of the ingredients on the board, then arrange the crackers and sliced bread just before serving.
Blog Comments & Tips
Simple can be quite impressive, especially when it’s a cheeseboard!
What’s not to love about a cheeseboard?! It’s simple, elegant, and so incredibly tasty with all those delicious assorted cheeses. Perfect for cocktail parties, with an aperitif before dinner (and sometimes in place of dinner), and a great last minute appetizer when guests pop over for a visit.
The cheeseboard is a spin off of the extremely popular charcuterie board (recipe coming soon), which has been around since the 15th century in France. My family has been eating charcuterie plates since before I was born, so this type of cold appetizer is right up my alley!
When it comes to cheeses, my family has always served a cheese plate as an individual course at the end of the meal. Some may find it odd, but we have always eaten meals in the French tradition. For all family dinners we had hors d’oeuvres, a first course, main dish, salad, cheese plate, and then dessert and coffee. For really special occasions we added a couple of other courses in between. Needless to say, we would sit around our dining room table chatting and laughing with friends and family for many hours.
Now that charcuterie boards and cheeseboards have become all the rage again, they are a definite go-to for those who like to entertain. And, if you love cheese like I do, this is a great way to try some interesting cheeses. Our Simple Cheeseboard is a quick and easy appetizer that is colorful for the eyes, and delicious for the palate. If you have guests with dietary preferences (such as a mix of omnivores, vegetarians, and gluten-free), this is a wonderful appetizer that satisfies all.
Although this cheeseboard is easily assembled a few minutes before your guests arrive, we always recommend taking your cheese out of the fridge about 30 minutes to 2 hours prior to serving. I know this is a huge variance, but it really depends on the weather in your area (humidity also plays a part).
If you have never tried eating specialty cheeses at room temp, buy a couple of fun cheeses and do a side by side taste comparison to feel and taste the difference between a cold and room temp piece of specialty cheese. Bringing your cheeses to room temperature will help them reach their full flavor for that first bite. The fat solids will soften, become silky smooth, and give the cheese a more nutty flavor.
Here are some tips to get the best results from our Simple Cheeseboard recipe.
Our 5 tips to making a great cheeseboard:
High quality ingredients (are you starting to see a theme with all our recipes?!)
Freshly baked French bread
A variety of interesting cheeses, served at room temperature (between 65 to 70 degrees). Don’t be afraid to experiment with new cheeses. There are amazing goat’s milk cheeses, sheep’s milk cheese, and of course, cow’s milk cheeses to choose from.
Pair the cheeses with an assortment of dried and fresh fruits, and make some specialty nuts to top it off. Try serving with our Healthy Cashews or our Zesty Honey Roasted Almonds.
Get creative and set the mood with a beautiful cutting board/cheese board for your foundation. We like the 20 X 15 inch bamboo board and the 14 inch olive wood board!
Have any dietary preferences that won’t quite work with our recipe? It’s time to customize and Pimp Our Recipe.
Pimp Our Recipe:
Make it Vegan: In place of milk cheeses, try using a variety of nut milk cheeses.
Make it Gluten Free: Use strictly gluten free crackers, and omit the French Bread.
Make it Dairy Free: In place of milk cheeses, try using a variety of nut milk cheeses.
Let us know what you think by leaving a comment and rating, and/or following, and liking us on Pinterest, Instagram, Facebook, and YouTube. Don’t forget to subscribe to get updates on new recipes and tips & tricks.
Santé!
Mich
Footnote: Remember to bring the cheese to room temperature before serving.

Every editorial product is independently selected. We may be compensated or receive an affiliate commission if you purchase products via our links. As Amazon Associates, we earn from qualifying purchases.